Rising damp
What is Rising Damp?
Nobody likes to know that there are damp issues in their home, and rising damp can often be one of the most problematic. Rising damp is caused by moisture that is present in your walls as a result of water collecting in the ground underneath or next to the walls, where it will rise up through the structure of the wall. It can occur in almost any wall including walls that are made from bricks, stone, or blocks. Capillary action, where the water is sucked through a small opening through tiny holes in the bricks or stone, leads to the water travelling upwards through the wall. The water will usually stop rising at a height where the gravity will counteract this force and stop it. Rising damp will usually only occur on the ground floor of a property and tends to only reach a maximum height of 1.2m. However, the effects of the damp, like salt deposits on the wall, can be seen higher, especially on walls that are covered in non-breathable coverings like certain paints or vinyl wallpaper.
The Signs of Rising Damp
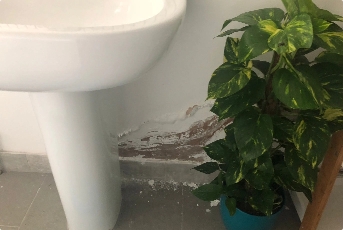
A ‘tide line’ of brown or yellow staining or brown plaster that occurs in the lower area of the room above the skirting boards is a typical sign that you are dealing with rising damp rather than another damp problem in your home. You may also notice that the skirting boards are damp or rotting, and that the damp is affecting your flooring or floorboards. White, fluffy deposits in the plaster on the walls is another common issue, which is caused by salts that the damp has washed out of the bricks and into the plaster. You may also notice black spots caused by mould that appear on the affected area of the wall.
Why You Should Never Ignore Rising Damp Signs?
Rising damp in the home is often an indication of a bigger issue with the damp-proof course, which is a waterproof layer designed to stop this problem from occurring. Rising damp can often mean that there is water which is being drained towards, rather than away from your home where it might not only be affecting the walls but also the foundations and ultimately the structure of your home. Along with being unsightly, another reason why rising damp should never be ignored is that it can also be harmful for your health, particularly if the damp leads to mould problems in the future. The spores can lead to respiratory problems, especially in people living in the home who already suffer from issues like asthma or allergies.
What are the Main Rising Damp Causes?
Rising damp problems will most usually occur as a result of having no damp proof course installed at the home, or where the damp proof course has become faulty due to inadequate installation or age. A damp-proof course is a waterproof layer that is installed in the wall or both walls if you have a cavity wall in your home, which is located around six inches from the outside ground on the exterior walls and under the raised timber or concrete floor on the internal walls. The layer is designed to repel water and prevent damp from occurring in the walls in your home.
In some cases, you can still experience rising damp even if the damp proof course is not damaged and is present. In this case, the damp-proof course might be breached, which means that there is something attached to your walls that has allowed the water to get around the damp proof course and into the walls. This might occur if there is an area of ground located next to the external wall that is higher than the damp proof course or an outside structure that has been installed above it. Rising damp can also be caused by debris that has reached above the level of the damp proof course providing a bridge for the moisture to go over it.
How Can You Be Sure It’s Rising Damp on the Internal Wall?
If you cannot find any problems or breaches of your damp proof course, remember that it might not be rising damp that you are experiencing in your home. One sign that it might not be rising damp that you are dealing with is if the damp reaches heights of more than 1.2m in the wall. In this case, your home might be dealing with other damp issues like penetrating dampness or even condensation damp instead. A damp proofing professional can help you determine which type of damp you are dealing with at home.
How to Find Out What’s Causing Rising Damp
A damp-proof specialist can come to inspect your home and determine the cause of the rising damp, and whether or not it actually is rising damp that you are experiencing. They will first inspect the damp proof course to ensure that it is present and to check for any signs of failure. They will also look for anything that could have potentially bridged or breached the damp proof course to allow the moisture to get around or over it. You can often check that a damp proof course is present by yourself since this will usually be visible outside your property as a line that should be located around six inches above the ground. Bear in mind that even if you have a fully functional damp proof course, your damp problems could be coming in from a neighbouring property. This happens if they do not have a damp proof course or have had a damp proof course installed higher up than yours, which will allow the moisture to travel around your home’s damp proof course.
What Rising Damp Treatment is Available?
As with all damp problems in your home, it’s important to ensure that you don’t deal with the effects of rising damp in the property before you have tackled the root cause. You should first identify the cause of the rising damp before dealing with it and then carrying out any necessary repair work on the effects of the issue.
You should avoid trying to carry out a quick job to get rid of the appearance of damp in your home, such as repointing or painting over the damp. This is because if the root cause of the rising damp has not been dealt with, it is only going to get worse and reappear over time, which will be more expensive in the long-term and mean that you will have to do the job all over again in the future. There are several ways to treat rising damp in your home depending on what the issue is that has led to it.
If the damp has been caused by a blocked cavity wall, you will need to unblock the cavity to get rid of the problem. In a case where your damp proof course has been bridged by high outside ground or similar, you will need to adjust whatever is causing the damp proof course to be bridged to ensure that it does not reach any higher than the damp proof course. You can sometimes do this by digging a trench that is around six inches deep by your house to make sure that your damp proof course is buried in the ground. If you decide to take this route, ensure that water is not able to pool in the trench that you have created since this can lead to further damp problems. If there is no way of removing the object that has breached your damp proof course or the damp proof course is faulty or not present, you may need to install a new one completely. A new damp proof course can be installed above the structure that is breaching it if you cannot remove the structure itself.
How the Damp Proof Course Works
A damp-proof course is a waterproof barrier that will span the length and width of your wall to stop water from the ground rising up through the walls. It should be installed at least six inches above ground level according to building regulations and standards. Damp proof courses are available in a range of different types from plastic sheet materials to chemical treatments.
The damp proof course is most commonly installed when the house is built, since it is harder to fit in a house that has been completed – although stainless steel sheets can be vibrated into the walls through saw cut slots by a professional. Some other damp proof course options include:
- Pore blocking salt mortar: A cement-based mortar which is injected into stone walls
- Water repelling chemicals: A range of gels, pastes or creams that will be injected into any type of wall
- Osmotic water repellence: This is achieved through embedded wires in the wall
Rising damp can become a serious problem at home. It is mostly an indication of something wrong with the damp proof course, and should always be inspected and treated by a professional as early as possible.
FAQ:
- What is Rising Damp?
- What Does Rising Damp Look Like?
- What Does Rising Damp Look Like on Internal Walls?
- What Causes Rising Damp?
- What Causes Rising Damp in Internal Walls?
- How to Treat Rising Damp
- How to Treat Rising Damp in an Old House
- How to Get Rid of Rising Damp When the Damp Proof Course is Bridged
- How to Fix Rising Damp with a New Damp Proof Course
- How to Stop Rising Damp
Return to main independent damp surveyors page.
Damp Survey Costs
Transparent pricing with no hidden fees for our independent, unbiased surveys.

Level 1
What’s included:
- Inspection of walls
- Inspection of floors
- Inspection of ceilings
- Leak inspection of drains and plumbing
- Damp information and prevention guide

Level 2
What’s included:
- Everything in Level 1
- Dry rot inspection
- Wet rot inspection
- Woodworm inspection
- Damp information and prevention guide
Level 3 (Most Popular)
What’s included:
- Thermal Imaging
- Air humidity testing
- HD boroscope camera
- Brickwork pointing inspection
- DPC inspection
- Ventilation flow test on extractor fans
- 4K drone imagery roof, chimney stack
and guttering inspection - Structural condition inspection
- Inspection of walls
- Inspection of floors
- Inspection of ceilings
- Leak inspection of drains and plumbing
- Dry rot inspection
- Wet rot inspection
- Woodworm inspection
- Damp information and prevention guide
Survey Add Ons
Add On 1
Laboratory analysis Of plaster identifies hygroscopic salts such as chlorides and nitrates. which indicate whether damp is caused by rising groundwater or by plumbing leaks, This testing removes guesswork, allowing the exact source of moisture to be identified so the correct treatment is applied rather than carrying out unnecessary damp-proofing work.
Add On 2
qPCR DNA mould testing detects microscopic mould spores that are invisible during a normal inspection and van remain hidden behind walls, floors. or inside building rkaterials. It identifies the exact mould species present and the contamination level, allowing hidden mould problems to be confirrned and properly treated before they affect the property or occupants’ health.
Qualifications: All our surveyors are PCA and CSRT qualified for remedial treatments and also CSSW qualified for structural waterproofing.
Next day report: You will receive the report within 24 hours of the inspection taking place.
The survey fee will be deducted from the cost of any recommended repairs.
These are the tools we use
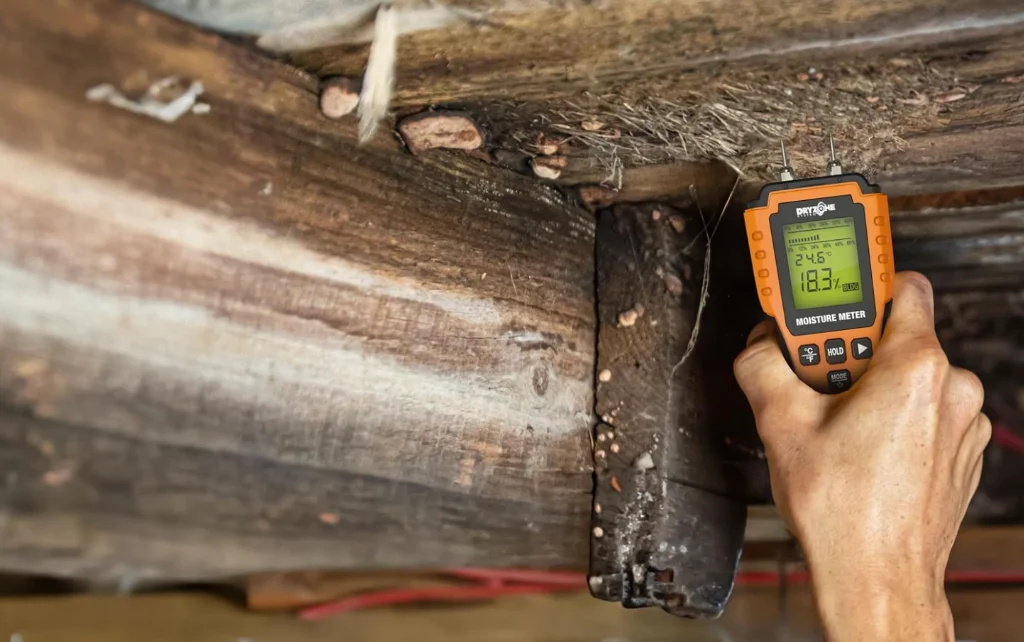
Damp Meter
A damp meter is a diagnostic tool used to detect and measure moisture levels within building materials such as plaster, brick, timber, and concrete.

Borescope camera
borescope camera is a small inspection camera attached to a flexible semi-rigid cable that allows you to see inside areas that are otherwise inaccessible.

Drone Inspection
A drone is a remotely operated aerial device equipped with a camera that allows visual inspection from above without the need for scaffolding or ladder.

Air Humidity Sensor
Air humidity sensor measures the amount of moisture present in the air, expressed as relative humidity (RH) in percentage. It helps determine whether indoor conditions are contributing to condensation, mould growth, or damp-related issues.
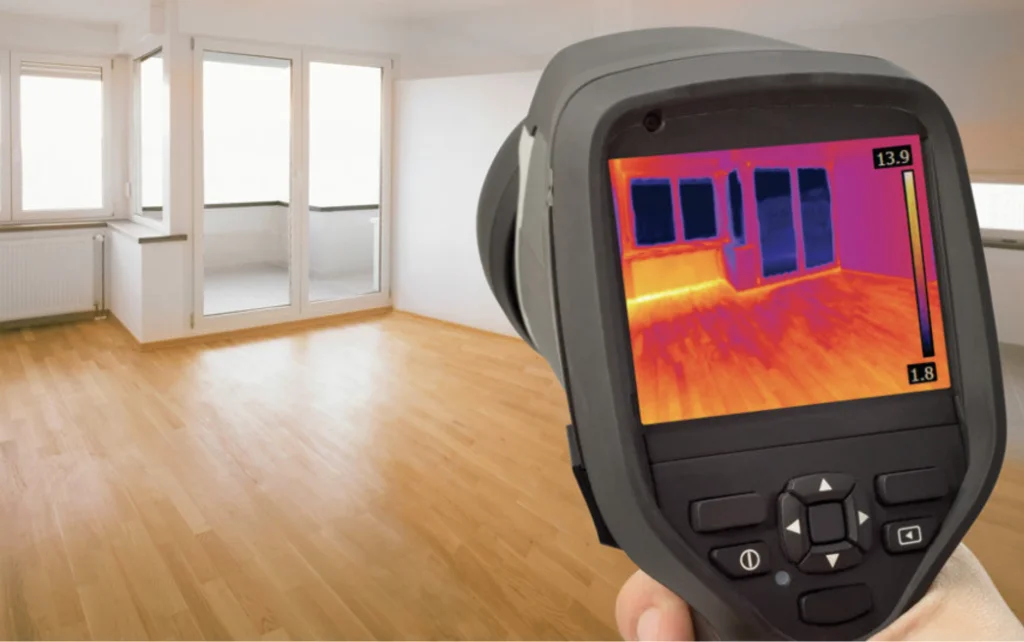
Thermal Imaging Camera
A thermal imaging camera detects temperature differences on surfaces by using infrared technology to produce a heat map image. In damp investigations, it helps identify cold spots, moisture intrusion, insulation defects, thermal bridging and leaks.
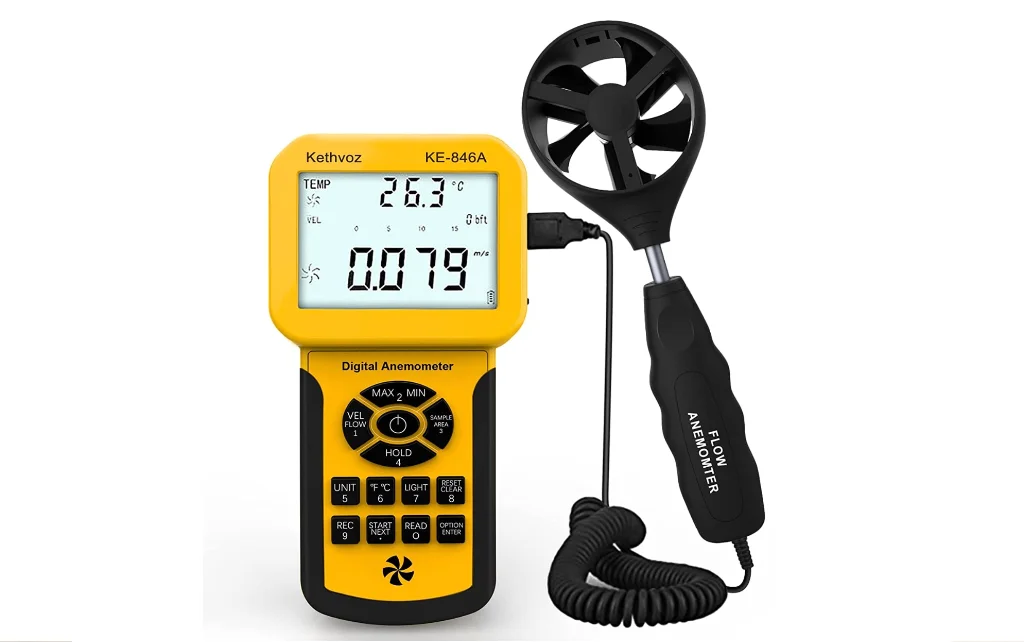
Air Flow Ventilation Detector
An air flow ventilation detector measures the movement and volume of air passing through vents, extractor fans, and air bricks. It confirms whether ventilation systems are working properly and achieving adequate air changes within a room. Poor airflow leads to trapped moisture, high humidity, condensation on cold surfaces, and ultimately mould growth.

Mould Lab Swab Testing
A mould swab test is carried out to confirm the presence of hidden mould growth and identify the specific species involved. Surface mould is not always visible, especially behind furniture, inside cavities, or within ventilation systems. Laboratory analysis of a swab sample determines whether active mould spores are present and what type they are, which helps assess potential health risks and decide the correct remediation approach rather than relying on visual assumption alone.

Lab Analysis of Plaster
Laboratory analysis of plaster is used to identify the type of salts present within the material, typically chlorides and nitrates. The presence and concentration of these salts help determine whether the moisture source is consistent with rising damp, ground contamination, or another forms [sic] of water ingress. such as mains water leak, This removes guesswork and prevents misdiagnosis, ensuring the correct remedial treatment is specified rather than applying unnecessary or ineffective solutions.
Contact Us
If you have some questions, please complete this form:
Book and Pay for a survey
If you are ready to book a survey and pay, please complete this form:

Contact Us
If you have some questions, please complete this form:
Book and Pay for a survey
If you are ready to book a survey and pay, please complete this form:
Contact Us
If you have some questions, please complete this form:
Book and Pay for a survey
If you are ready to book a survey and pay, please complete this form: